Posts

Showing posts with the label DIY

Halloween Craft Tutorials for Kids

Image
🎃 Halloween Craft Tutorials for Kids  🎃 Halloween is the perfect excuse to break out the glue sticks, googly eyes, and glitter—and if you’ve got kids at home or in the classroom, these crafts are a guaranteed hit. Whether you’re prepping for a party, filling a rainy afternoon, or just want to add some spooky charm to your space, these DIYs are simple, budget-friendly, and packed with personality. From squishy sensory bags to no-carve pumpkins, here are six Halloween craft ideas that are easy to make and even easier to love! Be prepared with The Ultimate Craft Box !! With over 3000 pieces of arts and crafts supplies & materials, you'll be all set for the crafts I share! 🧠 Monster Sensory Bags Supplies Needed: • Ziplock bags • Hair gel (clear or colored) • Googly eyes • Glitter (optional) • Duct tape or packing tape Steps: 1. Fill a Ziplock bag with a few tablespoons of hair gel. 2. Add glitter and googly eyes into the gel. 3. Seal the bag tightly, pressing ou...

Bubble Painting

Image
  This was MESSY but SO FUN! I recommend doing this one in the kitchen or even outside! Mainly for easy clean up! Some of our other Hands-on Learning Crafts and Learning Through Play Videos: Handprint Mother's Day Flower Bouquet Primary Colors Experiment   Watercolor Coloring Craft Handprint Flower Pots Rolled Birds Craft   What you need: - plain sheet of paper - small cups or  paint cups - straw - various colors of tempura or washable paint - water - dish soap Instructions: 1. mix 1/4 cup water, 2 TBSP dish soap and about a 1/4 cup paint into a cup so that the mixture if about half way filling the cup 2. using the straw, blow bubbles until it bubbles over the top of the cup 3. blot the bubbles with the paper, to "capture" the bubbles 4. repeat steps 2 and 3 until your picture is perfect!

Salt Painting

Image
  This one is a bit messy and takes a bit more time than my normal ones. This one I have been told can be done while the glue is dry OR wet. So it will not take longer if you let the glue dry. But either way, it is a fairly quick craft. Some of our other Hands on Learning and Learning Through Play Videos: Magic Paper Towel Paintings   Handprint Mother's Day Flower Bouquet Watercolor Coloring Craft Handprint Flower Pots What you need: - plain sheet of paper - pencil - watercolor paints and brush - table salt - glue bottle - check out the quick tutorial here Directions: 1. using the pencil, draw the design you want to make 2. then trace the drawing with glue, make sure the glue is even and follows all the lines 3. pour table salt on the glue, then carefully dump the excess off and into the waste (or save for another) 4. using the watercolors, gently add paint to the salt by touching the brush to the salt. the paint and color will seep on the salt giving it the color!

Watercolor Coloring Craft

Image
  This is a simple and quick one! Takes less than 5 minutes to prep and complete! You can do either blank pieces of paper, coloring sheets or print your own pictures!  Some of our other Hands on Learning and Learning Through Play Videos: Magic Paper Towel Paintings   Handprint Mother's Day Flower Bouquet Handprint Flower Pots What you need: - coloring page or a printed coloring page - markers - foil - spray bottle with water Directions: 1. using the markers, color on the piece of foil 2. once your foil piece has all the colors you want, spray some water on it 3. gently press your coloring page or printed page over the damp foil 4. carefully separate the foil and paper to reveal a beautiful watercolor design!

I love you BERRY much craft

Image
  This is a cute and quick one! I am starting to see most of these are mainly taking less than 30 minutes to prep and complete!  What you need: - piece of plain paper - permanent marker - black - black paint - red paint - green piece of paper for the strawberry leaf - glue stick for the leaf - watch the  tutorial video ! Directions: 1. paint your child's hand red and place in the center/towards the bottom of the paper, let dry 2. using black paint, let your child pout the little black seeds on the strawberry 3. glue the green leaf (or paint them on) to the top of the strawberry/palm of the hand area 4. Add "I love you BERRY much!" to the top and voila!  Check out our other Hands on Learning and Learning Through Play craft links: Magic Paper Towel Paintings   Handprint Mother's Day Flower Bouquet Handprint Flower Pots Handprint Cactus   Summer Lemon and Lime Craft  

Bloom Flower Craft

Image
  This is a cute and quick one! I am starting to see most of these are mainly taking less than 30 minutes to prep and complete!  What you need: - template or a plain piece of paper - pink or your choice of color paint - watch the  tutorial video ! Directions: 1. print the template OR draw  the stems and leaves with the green paint  2. paint your child's hand pink (or whatever color you chose) and place on top of the stem, let dry 3. And voila, tour done!!  Check out our other Hands on Learning and Learning Through Play craft links: Magic Paper Towel Paintings   Handprint Mother's Day Flower Bouquet Handprint Flower Pots Handprint Cactus   Summer Lemon and Lime Craft  

Thanksgiving Crafts: Turkey Handprints

Image
  This is a cute and quick one for Thanksgiving! I am starting to see most of these are mainly taking less than 30 minutes to prep and complete!  What you need: - piece of plain paper - green, brown, red, orange, yellow paint - googly eyes !  - watch the  tutorial video ! Directions: 1. paint your child's hand brown and each finger a different color then place in the center/towards the bottom of the paper, let dry 2. after its dry, either use a googly eye or paint a black spot for the eye, add the feet, beak and waddler 3. AND your done! Check out our other Hands on Learning and Learning Through Play craft links: Magic Paper Towel Paintings   Handprint Mother's Day Flower Bouquet Handprint Flower Pots Handprint Cactus   Summer Lemon and Lime Craft  

Handprint Cactus Craft

Image
  This is a simple and quick one! Takes less than 30 minutes to prep and complete! You can do either paint or construction paper like we did! (If you do paint, use white paint to make the cactus markings when dry) Some of our other Hands on Learning and Learning Through Play Videos: Magic Paper Towel Paintings   Handprint Mother's Day Flower Bouquet Handprint Flower Pots What you need: - piece of plain paper, green Constuction paper (we use two shades) and a brown piece of paper - glue stick - white colored pencil - #2 pencil for tracing - scissors  - watch the  tutorial video ! Directions: 1. start by tracing your child's hand on the green construction paper, we made 4 but used 3 2. cut out the hand prints and cut out pots for the cactus to sit in 3. draw designs on the cactus (stars, dots, lines, x's) using the white colored pencil 4. glue the cactus down, then glue to pot covering a bit of the bottom.

Summer Handprint Activity: Lemon & Limes

Image
  This is a cute and quick one! I am starting to see most of these are mainly taking less than 30 minutes to prep and complete! We do have this template available on our TPT site! (That is until we figure out a better way to make them available!) Some of our other Hands on Learning and Learning Through Play craft links: Magic Paper Towel Paintings   Handprint Mother's Day Flower Bouquet Handprint Flower Pots What you need: - piece of plain paper (or our template from TPT here ) - yellow and green paint - green/black marker for the stem and leaf - watch the  tutorial video ! Directions: 1. print out the template paper "Squeeze the most out of summer" or grab a solid sheet of paper 2. paint your child's hand yellow/green and place on one side (or if using the template, under the stem/leaf) 3. using the green/black markers, draw in the leaf and stem (if not using the template) 4. voila!  Templates available for purchase on our TPT site! ( https://www.teacherspayteachers...

Butterfly Footprints

Image
This is a simple and quick one! Takes less than 10 minutes to complete! We did it for Mother's Day, but it can be for anything! We have done a few of these over the years! Some of our other Hands on Learning and Learning Through Play Videos: Magic Paper Towel Paintings   Handprint Mother's Day Flower Bouquet Handprint Flower Pots What you need: - piece of plain paper  -  finger paint   - paint brushes - paper towels to wipe feet - watch the  tutorial video !  Directions: 1. draw the body of the butterfly in the middle of the page 2. using whatever color they want and paint their feet 3. place their foot opposite to the butterfly to create the wings of the butterfly 4. let it dry then add eyes and a smile!

Handprint Flower Pots

Image
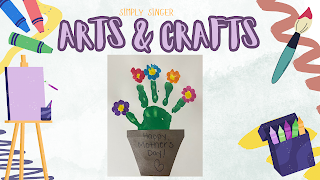
This is a simple and quick one! Takes less than 30 minutes to prep and complete! We did it for Mother's Day, but it can be for anything! Some of our other Hands on Learning and Learning Through Play Videos: Magic Paper Towel Paintings   Handprint Mother's Day Flower Bouquet What you need: - piece of plain paper and a brown piece of paper -  finger paint  on a plate - paint brush - paper towels to wipe fingers - watch the  tutorial video ! Directions: 1. start by using green to make the stem and paint your child's hand 2. using yellow (or whatever color they want), make the center of the flowers with their fingers 3. select a different (or same) color for each flower and use their finger to place the petals 4. let it dry then add the pot shaped paper! you can add whatever message you want to the pot! 

Handprint Mother's Day Flower Bouquet

Image
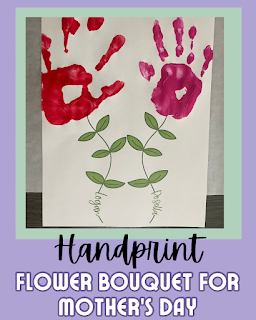
  This is a simple and quick one! Takes less than 15 minutes to prep and complete! I did use Google to find the perfect looking stems for me and added my kids names in. If you are not super tech savvy, you can always draw the stems and write their names. EVEN BETTER let them write their names!  What you need: - piece of plain paper -  finger paint - paint brush - watch the  tutorial video ! Directions: 1. either draw or print out the stems. I used Google to find the image then PIXLR to add the name in.  2. paint your child's hand whatever color they choose 3. place their hand on the stem top 4. let it dry!

Activity and Fun Things for Kids! - Q1 2024

Image
 Hey!! So I was sitting here thinking about how to share some of the things we have found or done that are perfect for kids! And I de used maybe a quarterly post, not too soon and also not a long span either. I think four times a year is good, your thoughts!?!?  Alright let’s start! It will be a picture, link to either a video of it and/or where to get one and short description of it and how my kids liked it. This will be probably longer than I will do since I have other unpublished posts with ideas right now, so I will lump them together here.  1.   Dollar store items usually are able to keep the kids entertained for at least half an hour.   2.   Crafts for craft stores - here we have Hobby Lobby and Michaels, where we can by little craft packages that contain various small crafts including pompom crafts, toilet paper roll crafts, pipe cleaner crafts, stained glass art, sand art, wood crafts, ceramic crafts and so many more!  Amazon...

Easter Craft Ideas

Image
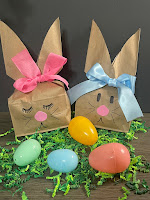
 Alright! So let’s start this real quick with I decided to create a YouTube Channel for my crafts, baking and what not! So subscribe here please!! Thanks!  I will add crafts overtime so check back soon!  Alright these little Paper Bag Easter Bunny Craft was a ton of fun to make! Video to the quick tutorial is here . But the steps are simple!  Draw triangles on the sides that it will gather when tied  Draw the ears Cut the lines Add eyes, nose and whiskers Fill with grass and put candy or eggs Use a cute ribbon to tie it shut  Add the fluffy bunny tail!  Peep Dot Paintings  were fun and a bit messy! Since we did not have circle foam painters, we improvised and did wood glued to q-tips! Simple and easy to do! Cut out the peep shape, take it down and paint!  VIDEO HERE !          Foam craft kits   were one of Rosella's favourites! She loved making them! We pick them up at our Hobby Lobby but you can get them so m...